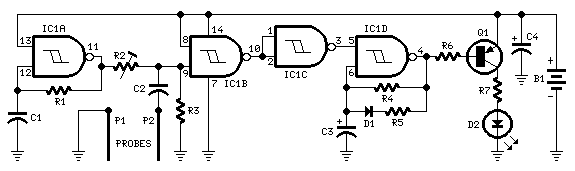
Plant Watering Watcher

Monday, March 19, 2012


Plant Watcher circuit diagram 

Parts:
R1,R4________470K   1/4W Resistors
R2____________47K   1/2W Trimmer Cermet or Carbon
R3___________100K   1/4W Resistor
R5_____________3K3  1/4W Resistor
R6____________15K   1/4W Resistor
R7___________100R   1/4W Resistor


C1_____________1nF  63V Polyester Capacitor
C2___________330nF  63V Polyester Capacitor
C3,C4_________10µF  25V Electrolytic Capacitors


D1__________1N4148  75V 150mA Diode
D2_____________5mm. Red LED


IC1___________4093  Quad 2 input Schmitt NAND Gate IC


Q1___________BC557  45V 100mA PNP Transistor


P1,P2_______Probes  (See Notes)


B1______________3V  Battery (2xAA, N or AAA 1.5V Cells in series)


Device purpose:
This circuit is intended to signal when a plant needs water. A LED flashes at a low rate when the ground in the flower-pot is too dry, turning off when the moisture level is increasing. Adjusting R2 will allow the user to adapt the sensitivity of the circuit for different grounds, pots and probe types.


Improvements:
This little gadget encountered a long lasting success amongst electronics enthusiasts since its first appearance on this website in 1999. Nevertheless, in the correspondence exchanged during all these years with many amateurs, some suggestions and also criticism prompted me to revise thoroughly the circuit, making some improvements requiring the addition of four resistors, two capacitors and one transistor.
This resulted in a more stable and easy to setup device, featuring a more visible flashing indicator with no resort to ultra bright LED devices.
Extensive tests were also carried out with different flower-pots and probes. Although, as can be easily imagined, differences from various pots and probe types proved to be exceedingly high, typical resistance values across two 60mm long probes driven fully into the pot's ground about 50mm apart measured around 500 to 1000 Ohm with a high water content and about 3000 - 5000 Ohm when the ground was dry.


Circuit operation:
IC1A and related components R1 and C1 form a 2KHz square wave oscillator feeding one gate input of IC1B through the voltage divider R2/R3 made variable by adjusting the Trimmer R2. If the resistance across the probes is low (as when there is a sufficient quantity of water into the pot) C2 diverts the square wave to ground, IC1B is blocked and its output will go steady hight. IC1C inverts the high status to low, thus keeping IC1D blocked: the LED is off.
When the ground in the flower-pot is becoming too dry the resistance across the probes will increase and C2 will be no longer able to divert the square wave to ground. Therefore, IC1B output begins to transfer the 2kHz signal to IC1C which, in turn, passes it to the oscillator built around IC1D.
No longer disabled by a low level on its input, the IC1D oscillator slowly pulses Q1 base low causing the LED to flash, signalling the necessity to water the plant.
The short low pulse driving the base of Q1 is actually a burst of 2kHz pulses and therefore the LED flickers about 2,000 times per second - appearing to the human eye as if the LED was steadily on for the entire duration of the pulse.


Notes:
A square wave is used to avoid problems of probes oxidization.
Probes are made with two pieces of bare, stiff lighting cable of 1mm diameter and should be about 60mm long.
The probes should be driven fully in the pot's ground about 30 - 50mm apart. Please note that all parameters regarding probes material, dimensions and spacing are not critical.
Current consumption: LED off = 150µA; LED on = 3mA for 0.1 sec. every about 2 sec. allowing the battery to last for years.
The quiescent current consumption is so low that the use of a power on/off switch was considered unnecessary. In any case, to switch the circuit completely off, you can short the probes.


SIMPLE SOLDERING IRON TEMPERATURE REGULATOR

Soldering irons are available in different wattage and usually run at 230V AC mains. However, these have no temperature control. Low-voltage soldering irons (e.g., 12V) generally form part of a soldering station and are designed to be used with a temperature controller. A proper temperature-controlled soldering iron or station is expensive. Here is a simple circuit that provides manual control of the temperature of an ordinary 12V AC soldering iron.
Simple Soldering Iron  

The circuit consists of power switch S1, TRIAC1, DIAC1, potentiometer VR1, resistors R1 to R3, capacitors C1 and C2, and step-down transformer X1. Adjusting the resistance of VR1 changes the charging rate of C1 to regulate the conduction angle of TRIAC1, and hence the output power (heat) of the low-voltage soldering iron connected to X1. The red LED (LED1) indicates the power status.
Assemble the circuit on a general-purpose PCB and enclose in a suitable plastic box. Since the front end of the circuit is directly connected to 230V AC mains supply, never attempt to operate the circuit without the cabinet. Use a heavy-duty potentiometer with plastic shaft and a knob for temperature control. 

DUAL COLOUR STROBOSCOPE


Stroboscope is a device used to make a cyclically moving object appear slow-moving or stationary. This is realised by illuminating the object intermittently with short pulses of light. Stroboscope is used in the study of insect flight. It can also be used for experiments with simple pendulum, studying details of rapidly moving objects and strobo-animation.
Here is the circuit of a stroboscope that produces dual-coloured light pulses (refer Fig.1). The circuit uses red and green LEDs as light sources to illuminate the object. You can choose the frequency of the stroboscope’s light pulses from a wide range of 5 Hz to 5 kHz as desired. The range of frequency (5-50 Hz, 50-500 Hz, 500 Hz-5 kHz, etc) is selected through capacitors Ca (C2, C3 and C4), Cb (C5, C6 and C7) and Cc (C8, C9 and C10). 


                      Fig.1 Circuit of dual-color Stroboscope

Smooth variation of the frequency range is achieved by varying VR1. The length of the light pulses (both red and green pulses are of equal duration) is adjusted by VR4. A flash of red and green light makes one cycle of the stroboscope. The frequency meter reads this frequency.
The circuit comprises a free-running oscillator formed by IC NE555 (IC1), IC CD4069 (IC2), dual-timer IC NE556 (IC3) and a few discrete components. The pulse output at pin 3 of NE555 triggers one-shot monostable IC3(A), which outputs a positive-going pulse that appears at the anodes of the LEDs (LED1 through LED4) through transistor T1. 
However, gates G3 and G4 cause only one of the transistors T2 and T3 to turn on. So the positive-going pulse from monostable IC3 (A) causes either the red LEDs (LED1 and LED2) or the green LEDs (LED3 and LED4) to turn on, depending on the phase of the oscillator.
The astable multivibrator configured around IC1 is made to produce a symmetric square waveform by using the combination of low-value fixed resistor R1 (2.2-kilo-ohm) and high-value potmeter VR1 (2-mega-ohm).
One-shot monostable IC3 (B) configured as a frequency meter triggers along with IC3(A). Strobe-phase delay or advance facility introduces a shift in the stationary orientation either clockwise or anti-clockwise when S2 is pressed momentarily. The 100µA ammeter is calibrated to read the frequency from 5 Hz to 5 kHz.
Presets VR5 and VR6 are used to set the maximum brightness of the LEDs. Potmeter VR7 is used to calibrate the frequency scale on the ammeter. The supply voltage should be regulated (7.0V) and there should be no voltage drop across the circuit when the LEDs glow. Any voltage drop affects the meter readings.
Assemble the circuit on a general-purpose PCB and enclose in a suitable cabinet. Fix the LEDs on the top or front side of the cabinet such that the LEDs’ light falls on the moving object.
For testing, construct a paper disk with two white patches as shown in Fig. 2. Fit the disk onto a direct-current motor spindle.
 
Fig.2 (L) A paper disk with a white patch, fitted onto a DC motor spindle, and (R) stationary patches of red and green color seen when the frequency of the stroboscope equals that of rotation of the disk.
Using switches S1 and S2, change the position of the patches in advance and delay motion, respectively. Pressing S1 slightly increases the frequency and pressing S2 slightly reduces the frequency. The change in frequency will make the patches to move in either clockwise or anti-clockwise direction.
Switch S3 provides a direct way to toggle between continuous and pulsed variable time periods. When switch S3 is thrown to continuous mode, the lights (LED1 through LED4) never go off—green and red LEDs glow alternately. For 50 per cent duty cycle of NE555, both red and green light go on and off alternately for the same duration. Use bright red and green LEDs for a good stroboscope output.
To measure the revolutions per minute (RPM) of the disk, tune the frequency using VR1 until stationary red and green patches are seen on the rotating disk. Next, note the reading of the ammeter to get revolutions per second (RPS) of the disk or motor. Multiply the result by 60 to get the RPM.
The stroboscope can be used to measure the RPM of a ceiling fan or table fan. For good visibility, make sure that the fan is clean and the light in the room switched off. Focus the red and green LED lights on the wings of the rotating fan. Vary VR1 until stationary red and green lights are seen on the wings of the rotating fan. Read the ammeter and divide the reading by 3 (for three wings of the fan) to get the rotation speed in RPS.

SERVO MOTOR TESTER


When using a servo motor in a project, if the servo motor does not respond as per the input, how to make sure that the fault is not in the servo motor but the circuit or logic? One way is to isolate the servo motor from the circuit and check its proper working by feeding it pulses of varying width and checking the angle that the servo motor turns to. For example, a 1.5ms pulse should make the motor turn to a 90-degree position (neutral position).


The circuit presented here generates pulses of varying widths. It is built around two NE555 timer ICs (IC1 and IC2) and a few discrete components. Timer IC1 is configured as an astable multivibrator with a time period of 20 ms. Every 20 ms, the astable provides a very sharp negative pulse to trigger IC2. Timer IC2 is configured as a monostable multivibrator that produces 1ms, 1.5ms and 2ms long pulses to rotate the servo motor (M1). 


Pin 4 of IC1 is pulled down by resistor R2. When switch S1 is pressed, the astable multivibrator triggers the monostable to produce a pulse as per the position of switch S2. Switch S2 can select resistors R4, R5 and R6 together, and R7 to produce monostable pulse output of 1 ms, 1.5 ms and 2 ms, respectively. Preset VR1 is used to set the time period of IC1 to 20 ms.


Using switch S2, select the monostable time period as 1 ms, 1.5 ms or 2 ms and press switch S1. The servo motor should rotate to extreme left, middle or extreme right, respectively.


LAPTOP AUDIO AMPLIFIER

Usually, the audio output from a laptop’s built-in speakers is low. A power amplifier is required to get a high volume. Here is a simple circuit to amplify the laptop’s audio output.


The circuit is built around power amplifier IC LA 4440 (IC1) and a few other components. LA4440 is a dual channel audio power amplifier. It has low distortion over a wide range of low to high frequencies with good channel separation. Inbuilt dual channels enable it for stereo and bridge amplifier applications.


In dual mode LA4440 gives 6 watts per channel and in bridge mode 19- watt output. It has ripple rejection of 46 dB. The audio effect can be realised by using two 6-watt speakers. Connect pins 2, 6 and ground of IC1 to the stereo jack which is to be used with the laptop.
Assemble the circuit on a general-purpose PCB and enclose in a suitable cabinet. The circuit works off regulated 12V power supply. It is recommended to use audio input socket in the circuit board. Use a proper heat-sink for LA4440.